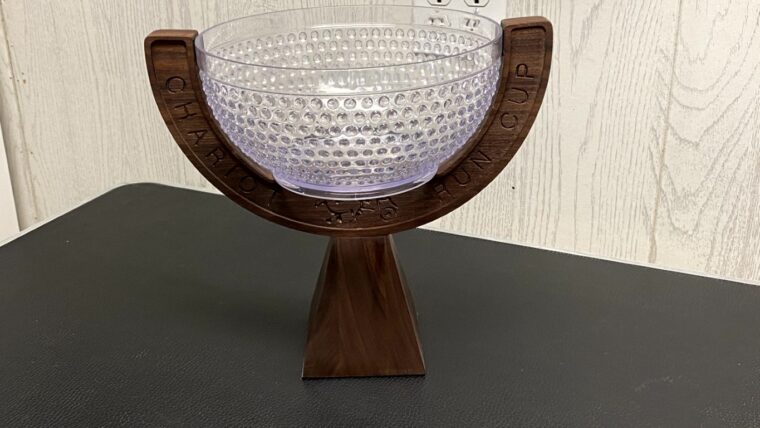
Since my golfing buddies and I play a skins game throughout the year, it seemed fitting to make a trophy to celebrate the yearly point winner. The first thing that came to mind was the Fed-Ex Cup that the pro’s play for, this is my version of that trophy…

This project was super challenging since the trophy required milling in 3 dimensions. The Cad drawing below was a first pass at what I wanted the trophy to look like.


I then started working with that model in Aspire, I wanted to do some engraving and insert the Chariot logo on the trophy. What I wasn’t certain of was how to cut the engraving on a tapered angle… hmmm.


Since the trophy was going to need to be milled on two sides; I created some locating pins so that it could be flipped over. I worked the top section first then the base later. The base will also be a problem since it needs to be cut on 4 sides and I don’t have a saw blade that will cut deep enough, another challenge…

Now that I have the rough design, I grabbed some 4 quarter Walnut from a local sawmill and glued up some blanks, that took a few days to complete and dry. While the glue process was happening, I quickly cut a test piece for the cup holder (top section of the trophy) using some MDF that was laying around, no taper, and the fit was terrific!

I then focused my attention to creating a jig that I could use when I needed to flip the work piece over to mill the opposite side; I also needed to engrave the face on an angle. I came up with an idea using a couple of hinges and then went ahead and drilled the locator pins. I then created a blank for testing and tested the locator pins, perfect!


Now to work on the glued up blank… I positioned the blank on the CNC and drilled the locator pin holes and then also cut tenon’s.

I surface planed the blank in my planer to create the taper on the blank. This process is hard to show but essentially I angled the blank on a jig and ran it through my planer. This ultimately created the taper I needed on the blank.


Now that the blank is ready I ran a couple of test cuts on a scrap piece of plywood so that I could make sure the programming was done correctly, I only get one shot at it. After I ran the program the pocket was cut correctly and the engraving looks good…

The main challenge with cutting the bowl holder is that it will be cut on an angle, the perimeter cut will need to be cut 90 degree to the bit. The red/purple lines represent the blank and the aqua lines below represent the face with the taper and how the face needs to be perpendicular to the cutter when engraving.


The next step is to flip the engraved side over and do the other side and the cut the perimeter…

Next is to mill the base of the trophy… this will be difficult since I don’t have a saw that can cut 5.5″ in depth. I’ll need to build another jig, and my plan is to use my 3″ fly cutting bit, taking thin passes. I glued up some stock and started working on a router sled and jig to mount the base in.

I used a couple of hinges so I could pivot the material to the necessary angle, hold it firmly in place, and mill it a side at a time.


After milling the base just needed some final sanding and to be oiled…


Here is the finished product along with the 1st year recipient..


Very Cool Adam!!!
Thank you…